If you’re using mods and suddenly see strange visuals like advanced x ray black lines fabric Minecraft is likely reacting to a conflict. These black lines can ruin your experience. They stretch across your screen and make everything look broken. Most of the time it’s because of a clash between shaders and x ray mods. Sometimes it’s just a bad installation. However the fix is usually easy. Reinstall the mod or remove conflicting files. Keep your Fabric loader updated too. Advanced x ray black lines fabric Minecraft issues can look scary but with a little effort your game can run smooth again.
Everything You Need to Know About the Advanced X-Ray Black Lines Fabric for Minecraft: Uncovering Hidden Secrets and Exploring the Game in a New Way
Minecraft, a game renowned for its creativity and exploration, constantly evolves to offer players new ways to enjoy the gameplay experience. One of the most popular mods and texture packs that players explore is the “X-Ray” texture pack. It offers a unique and often game-changing experience, making it easier for players to uncover hidden resources and structures by allowing them to see through blocks. In this article, we will dive deep into the world of the Advanced X-Ray Black Lines Fabric for Minecraft, providing a detailed overview and a simple guide on how to install and use these tools in both the Java and Bedrock versions of the game.
What is an X-Ray Texture Pack in Minecraft?
An X-Ray texture pack is a modification for Minecraft that allows players to see through blocks and terrain. This means that players can spot ores, caves, structures, and mobs hidden behind solid blocks without needing to dig or explore in traditional ways. The X-Ray feature is popular among players who want to gather resources quickly or explore Minecraft’s world in a new, unique way.
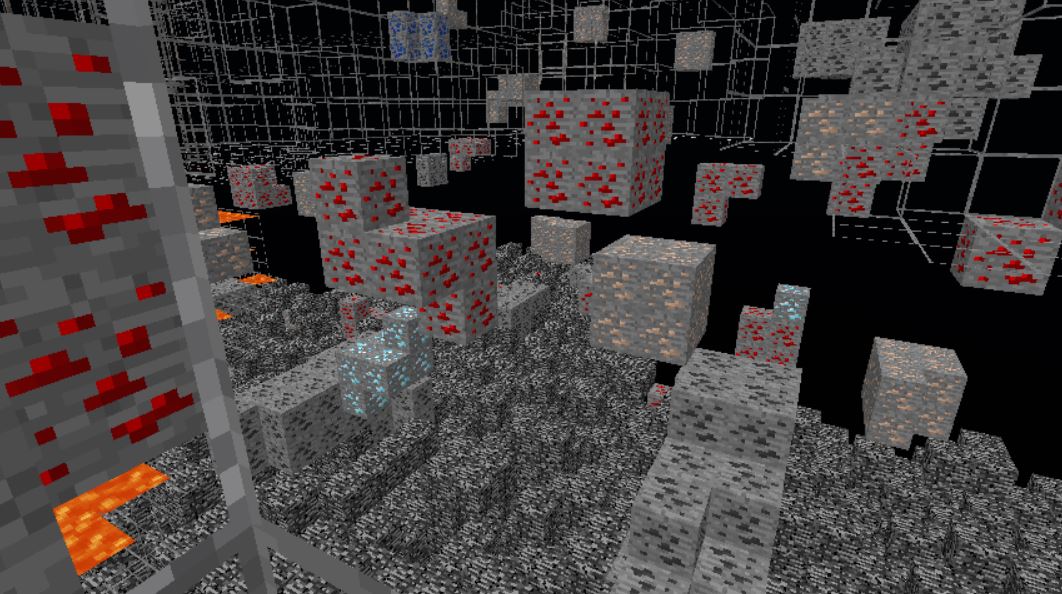
When it comes to the Advanced X-Ray Black Lines Fabric, this is a specialized version of the X-Ray pack, with the addition of black lines in the textures. These lines serve to enhance the visibility of the items and structures hidden within the game world. It’s a great way for players who are into mining or building to find valuable resources faster, making the gameplay more efficient.
How Does the X-Ray Texture Pack Work?
The X-Ray texture pack works by altering the way Minecraft renders blocks. Typically, Minecraft uses textures to make the environment look more realistic and colorful. However, an X-Ray texture pack simplifies these textures, often making solid blocks appear transparent or completely invisible. By doing so, players are able to see through the world, revealing hidden structures or resources like diamonds, gold, iron, and other valuable ores.
Features of the Advanced X-Ray Black Lines Fabric
-
Visibility: One of the most notable features of this specific texture pack is its use of black lines that make the hidden blocks more visible. These lines provide a clear outline for players, making it easier to spot ores and caves behind blocks.
-
Resource Discovery: It significantly helps players find precious resources without needing to spend hours digging and mining through large portions of the world.
-
Aesthetic Changes: While most X-ray packs focus on simple visibility, the black lines in this particular fabric provide a more striking and visually appealing look that enhances the player’s overall experience.
-
Mod Compatibility: This X-ray fabric is designed to work seamlessly with Minecraft’s popular mods, making it ideal for players using a combination of multiple mods and texture packs.
-
Performance: The pack is optimized to reduce lag and ensure that the game runs smoothly, even when scanning large areas for hidden treasures.
How to Install the Advanced X-Ray Black Lines Fabric in Minecraft
For Minecraft Java Edition
Installing the X-Ray Texture Pack in the Java Edition of Minecraft is straightforward. Here’s a step-by-step guide:
-
Download the Texture Pack:
Begin by finding a reliable source where you can download the Advanced X-Ray Black Lines Fabric. Be sure to get the right version for the Java Edition. -
Install Optifine:
In order to use many texture packs, including X-Ray, you will need to install Optifine. Optifine is a performance optimization tool that allows you to use custom texture packs and enhances game graphics. You can download Optifine from its official website. -
Place the Texture Pack:
Once Optifine is installed, go to your Minecraft directory, typically found in %AppData%/.minecraft on Windows or ~/Library/Application Support/minecraft/ on macOS. Inside the resourcepacks folder, drag and drop the downloaded X-Ray texture pack. -
Activate the Pack:
Open Minecraft and go to the Options menu, then Resource Packs. You will see the Advanced X-Ray Black Lines Fabric in the list of available packs. Click on it to move it into the active slot, and you’re good to go! -
Enjoy Your X-Ray Vision:
Once the texture pack is activated, you’ll start seeing through blocks, making it easier to find valuable resources. The black lines will make this process even more efficient by highlighting key areas.
For Minecraft Bedrock Edition
For players who enjoy Minecraft Bedrock (also known as the Windows 10, Pocket Edition, or Console version), the process is a bit different but still easy to follow:
-
Download the X-Ray Texture Pack:
Similar to the Java version, find a trusted website that offers the X-Ray Black Lines Fabric for Bedrock. -
Import the Pack into Minecraft:
On your device, open Minecraft and navigate to the Settings menu. From there, select Storage and scroll down to find Resource Packs. Click on Import and find the file you downloaded for the X-Ray pack. -
Activate the Texture Pack:
After importing the texture pack, go back to the game’s main menu. Enter your world and go to the Settings menu, then select Global Resources. Choose the X-Ray Black Lines Fabric and activate it. -
Explore the Game:
Just like in the Java Edition, the pack will make it easier to see through blocks and uncover hidden resources.
For Minecraft Pocket Edition (MCPE)
The X-Ray Texture Pack can also be used in Minecraft Pocket Edition (MCPE). The installation process is slightly more complicated due to the limited resources available in the mobile version of Minecraft, but it’s still feasible.
-
Download the Pack:
Ensure you download the right file for MCPE. -
Install the Pack:
Use a file manager on your device to open the downloaded pack and place it in the resource_packs folder in Minecraft’s game files. -
Activate the Pack:
Open Minecraft, go to Settings, then Global Resources, and activate the X-Ray pack. -
Play:
Now, when you enter a world, you will be able to use the X-Ray functionality to easily find ores and other hidden elements.
Why Do Players Use the X-Ray Texture Pack?
Players have different reasons for using the X-Ray texture pack, including:
-
Mining Efficiency: Mining is an essential part of Minecraft, and the X-Ray texture pack makes it faster and easier. Players can find ores like diamonds, gold, and iron without wasting time digging through layers of stone or dirt.
-
Exploration: For those who love to explore caves and underground structures, the X-Ray pack helps spot hidden locations without having to wander for hours.
-
Cheat-Free Exploration: While some might use the X-Ray pack to cheat in competitive play, many players simply use it to save time or for fun exploration.
-
Building: The pack can also assist builders in locating materials quickly, whether for a specific build or to gather necessary resources for a large project.
The Ethics of Using an X-Ray Texture Pack in Minecraft
While the X-Ray Texture Pack offers numerous advantages, it’s important to use it ethically. In single-player modes, it’s completely acceptable to use an X-ray pack to improve your gameplay. However, using such a pack on multiplayer servers may be considered cheating, and many servers will ban players who use these mods. It’s always a good idea to check the rules of the server before using any mod that gives you an unfair advantage.
How to Fix Black Lines in Minecraft?
Black lines in Minecraft can be a frustrating issue for players, as they may interfere with the overall gaming experience. These lines can appear randomly across the screen or as a part of the environment, causing visual glitches that disrupt immersion. Thankfully, there are a few potential solutions to fix this problem.
First, it’s important to understand that black lines are often linked to graphical rendering issues, typically caused by your graphics settings, outdated drivers, or issues within the Minecraft game files themselves.
-
Update Your Graphics Drivers: Outdated or corrupted graphics drivers are one of the primary culprits of graphical glitches, including black lines. Make sure your graphics card drivers are up to date by visiting the official website of your GPU manufacturer (NVIDIA, AMD, or Intel) and downloading the latest drivers.
-
Adjust Graphics Settings: Sometimes, adjusting the graphics settings in Minecraft can solve the issue. Lowering settings like render distance or graphics quality can help. In some cases, setting Minecraft to “Fast” graphics mode rather than “Fancy” can reduce the occurrence of black lines, especially on lower-end systems.
-
Check for Mods and Resource Packs: If you’re using any resource packs or mods, it’s possible that one of them is causing the graphical glitch. Disable these and see if the problem persists. If removing the mods or resource packs fixes the issue, try reintroducing them one by one to identify the culprit.
-
Reinstall Minecraft: If all else fails, reinstalling Minecraft can resolve many performance and rendering problems. Make sure to back up your saved worlds before reinstalling, as this process will remove all your game files.
By following these steps, you should be able to fix black lines in Minecraft and restore smooth gameplay.
How to Install XRay 1.21.5?
XRay is a mod that allows players to see through blocks, making it easier to find resources like diamonds and ores in Minecraft. The process of installing XRay for Minecraft version 1.21.5 is simple if you follow these steps:
-
Install Minecraft Forge: Before installing XRay, you need to have Minecraft Forge installed. Forge is a modding platform that allows you to load and manage mods. To install it, go to the official Minecraft Forge website, select the version of Minecraft you want (in this case, 1.21.5), and download the installer. Run the installer, and once complete, launch the Minecraft Launcher, select the Forge profile, and click “Play.”
-
Download XRay Mod: Next, visit a trusted website like CurseForge to download the XRay mod for Minecraft version 1.21.5. Ensure that you’re downloading the correct version to avoid compatibility issues.
-
Install the XRay Mod: Once downloaded, place the XRay mod file (a
.jarfile) into your Minecraft mods folder. To find this folder, navigate to your Minecraft installation directory, and open the “mods” folder. If the folder doesn’t exist, simply create one. -
Launch Minecraft: After installing XRay, open the Minecraft Launcher and select the Forge profile. Click “Play,” and the mod should be active in the game.
How Do You Use Advanced XRay Fabric?
Fabric is a lightweight modding tool for Minecraft that allows players to easily install mods like Advanced XRay. To use Advanced XRay with Fabric, follow these steps:
-
Install Fabric: First, you need to install the Fabric mod loader. Download the installer from the official Fabric website and run it. Make sure you select the correct Minecraft version (e.g., 1.21.5).
-
Download Advanced XRay Mod: After installing Fabric, download the Advanced XRay mod from a reliable mod repository like CurseForge.
-
Place the Mod in the Mods Folder: Move the Advanced XRay mod file (usually a
.jarfile) into the Minecraft mods folder. This folder can be found in your Minecraft installation directory. -
Enable XRay Features: Launch Minecraft using the Fabric profile, and you’ll have access to Advanced XRay features. In-game, you can customize the XRay mod to control which blocks you want to see through, such as ores or mobs.
With Advanced XRay, you gain more control over the visibility of blocks and resources, enhancing the overall experience of resource hunting.
Is XRay Legal in Minecraft?
The legality of using XRay in Minecraft is a gray area. Technically, XRay is not an officially supported feature of the game, and Mojang, the developers of Minecraft, have stated that using third-party mods to alter the game’s mechanics, including XRay, is not allowed in official multiplayer servers. If you’re playing on a private server, the server administrators may allow or prohibit XRay mods depending on their policies.
In single-player mode, the use of XRay is less controversial since it doesn’t affect other players. However, using XRay on multiplayer servers can result in penalties such as being banned or temporarily suspended. Always check the rules of the server you’re playing on to ensure that XRay is allowed.
Can Black Lines on Screen Be Fixed?
Yes, black lines on your screen can typically be fixed. As mentioned earlier, these lines may be caused by graphics card issues, outdated drivers, or corrupt game files. Apart from updating drivers and adjusting settings, another potential solution is checking your display’s physical connections. Ensure that the cables connecting your monitor to the computer are secure and free from damage. Additionally, check if your monitor itself is functioning properly. If the issue persists, testing the system on a different monitor can help determine if the problem lies with the hardware.
How to Get Rid of Block Outlines in Minecraft?
Block outlines in Minecraft are a common feature that helps players see the borders of blocks, especially when placing or interacting with them. However, if you find them distracting, you can disable these outlines by modifying the game’s settings. Here’s how:
-
Open Minecraft Settings: Start the game, then go to the settings menu.
-
Navigate to Video Settings: In the video settings, look for an option that controls “Block Outline” or “Show Block Selection.” Simply toggle this option off to remove the outlines.
Alternatively, if you’re using a mod, like OptiFine, you may find additional customization options to disable or modify the appearance of block outlines.
How Do You Install Ray Tracing?
Ray tracing is a cutting-edge visual feature that enhances the lighting and shadows in Minecraft, giving the game a more realistic appearance. To install ray tracing, you need a computer with a supported GPU (typically NVIDIA’s RTX series). Here’s how to enable ray tracing in Minecraft:
-
Install Minecraft with RTX Support: Ensure you have the Java version of Minecraft and the Bedrock edition if you’re using the RTX features. Install the game through the Microsoft Store if necessary.
-
Update Your Graphics Drivers: Make sure your graphics drivers are up to date, especially if you’re using an NVIDIA RTX GPU.
-
Activate Ray Tracing: Go into the video settings and toggle the ray tracing option. You may also need to enable specific resource packs designed to optimize ray tracing.
How to Install MC XRay?
To install MC XRay, follow similar steps to installing other mods. First, download the mod file from a reliable website. Then, place the mod in the mods folder of your Minecraft directory and ensure that you have the correct mod loader (e.g., Forge or Fabric) installed. Once everything is set up, you can activate XRay in the game and start using it for enhanced resource discovery.
How to Install Optifine in Minecraft
Optifine is a popular mod that enhances Minecraft’s performance and visual quality. It provides improved graphics, increased frame rates, and allows users to tweak various graphical settings, including dynamic lighting, shadow effects, and more. To install Optifine, follow these steps:
-
Download Optifine:
First, visit the official Optifine website (https://optifine.net/downloads) and select the version of Optifine that matches your Minecraft version. Optifine is regularly updated, so ensure you download the latest version for the most stable experience. -
Install Optifine:
After downloading the Optifine.jarfile, run it. You’ll see an installer window pop up. Click on the “Install” button to begin the installation process. Optifine will automatically install and integrate itself with the Minecraft launcher. -
Launch Minecraft:
Open the Minecraft Launcher and ensure that the Optifine profile is selected from the dropdown menu in the bottom left corner. If it’s not there, you may need to create a new profile that uses the version of Minecraft you installed Optifine for. -
Adjust Settings:
Once Minecraft loads, go to “Options” and then “Video Settings” to access Optifine’s enhanced settings. Here, you can fine-tune various graphics options, such as performance, quality, and animations, to optimize your game.
By following these simple steps, you can easily enjoy the benefits of Optifine in Minecraft, which can significantly improve both the performance and appearance of the game.
Is CurseForge Safe?
CurseForge is one of the most popular modding platforms for Minecraft and other games. It provides a vast repository of mods, maps, and resource packs that players can download and use in their games. But is it safe?
CurseForge itself is a reputable platform owned by Overwolf, and it works with well-known mod creators to ensure the mods available are safe to use. However, like any website offering downloadable content, you should be cautious. Mods uploaded to CurseForge go through an approval process to check for malware and other harmful content, but some risks always exist when downloading files from the internet.
To stay safe when using CurseForge:
-
Stick to trusted creators: Many mod creators are known in the community for producing reliable and safe mods. Always check the mod’s download page for comments or reviews from other users.
-
Install a good antivirus: This adds an extra layer of security when downloading files from any website, including CurseForge.
-
Download mods from official sources: Ensure you’re downloading mods from the CurseForge website and not third-party sites, which might offer altered versions containing malicious software.
Can I Use Neoforge Mods on Forge?
Neoforge is a modding platform designed to provide advanced features for modders, but it’s not directly compatible with the more widely used Forge modding system. While Forge is the dominant modding API for Minecraft, Neoforge was built as an alternative that offers its own modding capabilities, often catering to more specialized use cases.
As for using Neoforge mods on Forge, the two aren’t natively compatible. Neoforge uses a different system, which means mods built for Neoforge typically won’t work on Forge unless specifically designed to do so. If you’re looking to use mods from both platforms, you might need separate installations or setups for each, as attempting to run them together could result in conflicts or crashes.
How Do You Use Fabricoat?
Fabricoat is a mod for Minecraft that integrates with the Fabric modding framework. It is designed to improve the user’s gaming experience by allowing mods to load more efficiently, improving performance, and offering additional customization options. Using Fabricoat typically involves the following steps:
-
Install Fabric Mod Loader: Before using Fabricoat, you must install the Fabric Mod Loader. You can find this on the official Fabric website.
-
Download Fabricoat: After installing Fabric, download the Fabricoat mod file from a trusted source such as CurseForge.
-
Place the Mod in the Mods Folder: Once downloaded, move the Fabricoat mod file to your Minecraft “mods” folder, which can be found in the Minecraft directory.
-
Launch Minecraft with Fabric: Open the Minecraft launcher and choose the Fabric profile. When you launch the game, Fabricoat will be active, enhancing your gameplay.
Fabricoat can improve performance and provide more flexibility for players who prefer using the Fabric modding framework.
What Is Banned in Minecraft?
Minecraft is a family-friendly game, but certain activities and behaviors are prohibited, either through server rules or the game’s official guidelines. Some common things banned in Minecraft include:
-
Hacking or Cheating: Mods that give players an unfair advantage, such as aimbots, speed hacks, or any program that alters the game’s code to cheat.
-
Griefing: Destroying or stealing from other players’ builds, often seen in multiplayer servers.
-
Exploiting Bugs: Using glitches or bugs to gain an advantage, such as duplicating items or bypassing game mechanics.
-
Inappropriate Content: Creating offensive or inappropriate structures, skins, or usernames.
Players who engage in banned activities can face penalties, such as being banned from servers or even having their accounts suspended or banned by Mojang.
Is It Illegal to Sell Minecraft Mods?
Selling Minecraft mods is a controversial topic. According to Mojang’s official terms of service, players are allowed to create and share mods for free. Selling mods could potentially violate these terms unless explicitly permitted by Mojang. Modders who attempt to sell their mods may risk having their work removed or being banned from modding.
In general, mod creators are encouraged to share their creations for free, and many use donation systems (such as Patreon) to support their work. However, selling mods without permission could lead to legal consequences, and modders should always be aware of the potential risks involved.
Does the Sniffer Exist in Minecraft?
The Sniffer is a recently introduced creature in Minecraft, officially announced during the Minecraft Live 2022 event. It’s a passive mob that players can find in the Overworld and will likely appear in the official game updates in the future. The Sniffer can help players in the game by sniffing out rare seeds, which can then be used to grow new plants.
While it currently does not appear in the game’s base version, players can expect to encounter the Sniffer in future updates as Mojang continues to develop the mob.
Why Am I Seeing Black Lines on My Screen?
If you’re seeing black lines on your screen while playing Minecraft, it’s often related to graphical issues. Some common causes include:
-
V-Sync Issues: If V-Sync is disabled, it can cause screen tearing, resulting in black lines or visual glitches. Enabling V-Sync in your game settings can solve this problem.
-
Outdated Graphics Drivers: Graphics driver problems can also cause display issues. Updating your GPU drivers may fix this problem.
-
Incorrect Resolution Settings: Ensure your in-game resolution matches your monitor’s native resolution to avoid graphical issues.
-
Faulty Hardware: In rare cases, black lines may be caused by failing hardware, such as a malfunctioning GPU or monitor. Running hardware diagnostics or testing with different hardware may help pinpoint the issue.
Conclusion
The Advanced X-Ray Black Lines Fabric for Minecraft is an exciting tool for players who want to experience Minecraft in a more efficient and creative way. Whether you’re playing in the Java Edition, Bedrock Edition, or MCPE, the installation and use of the X-Ray texture pack will make mining, exploration, and resource discovery much easier. This pack, with its black line feature, enhances visibility, allowing players to spot ores, caves, and structures with ease.
FAQs
Q: What causes phone screen bleeding?
A: Phone screen bleeding occurs when light leaks around the edges of the screen, typically caused by issues with the display’s adhesive or the screen’s connection to the device. It can also result from a physical impact or manufacturing defects.
Q: Do screen lines go away?
A: It depends on the cause of the lines. If they are due to a software issue, they may disappear after a restart or software update. However, if the lines are caused by hardware damage, they typically won’t go away without repair or screen replacement.
Q: How to fix Minecraft black lines?
A: To fix black lines in Minecraft, try the following:
-
Update your graphics drivers.
-
Adjust Minecraft’s video settings, particularly the render distance and anti-aliasing.
-
Ensure that your game and Java version are both up-to-date.
-
If using Optifine, check the settings for any conflicts.
Q: How to allocate more RAM to Minecraft?
A: To allocate more RAM to Minecraft:
-
Open the Minecraft Launcher.
-
Go to “Installations” and select the version you want to modify.
-
Click on the “More Options” button.
-
In the “JVM Arguments” field, modify the “-Xmx” value to allocate more RAM (e.g., -Xmx4G for 4 GB).
Q: How to hide hitboxes in Minecraft?
A: To hide hitboxes in Minecraft:
-
Press F3 + B on your keyboard.
-
This will toggle the visibility of hitboxes. Pressing the same combination again will hide them.
Q: What device do you need for ray tracing Minecraft?
A: To use ray tracing in Minecraft, you need a device with a compatible GPU, such as NVIDIA RTX 20-series or newer graphics cards. You will also need Minecraft with the RTX feature enabled and the Windows 10/11 edition.
Q: Is ray tracing free?
A: Ray tracing in Minecraft is free, but you need a compatible RTX graphics card, and it requires the Windows 10 or 11 version of the game to work. There is also a separate “RTX” graphics pack you can download to enhance the experience.
Q: How do I turn on ray tracing RTX?
A: To enable ray tracing in Minecraft:
-
Ensure you have an RTX-capable GPU and the latest graphics drivers.
-
Download the “RTX” texture pack from the Minecraft Marketplace.
-
Go to “Settings” in the game, then to “Video” settings, and turn on “Ray Tracing.”
-
Restart the game to apply the settings.
You May Also Like
- Will GTA 6 Online Have Crossplay Between PC, Xbox, and PS5?
- Is GTA 6 Going to Be Cross Platform Between PC, PS5, and Xbox?